Installing a ceramic tile backsplash is one of the most transformative upgrades you can make in a kitchen. Not only does it protect your walls from splashes and stains, but it also adds style, personality, and a polished look that enhances the entire space. Many homeowners hesitate because they think tiling is complicated, but with the right approach, tools, and guidance, installing a backsplash ceramic tile is a manageable DIY project. In this guide, we cover everything you need to know from planning and materials to installation and finishing touches so you can achieve a flawless backsplash.
Short Answer: How to Install Backsplash Ceramic Tile
For those looking for a quick solution, here’s a concise approach:
- Measure the area to determine how many tiles you’ll need.
- Prepare and clean the wall, ensuring it’s dry and smooth.
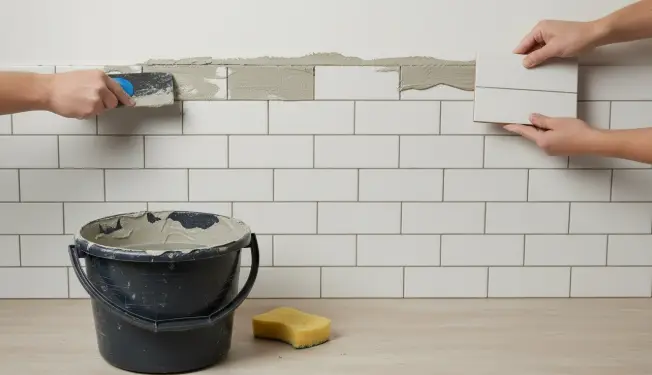
- Apply adhesive with a notched trowel.
- Place tiles using spacers for even spacing.
- Let the adhesive dry, then grout the joints with a rubber float.
- Clean the tiles with a damp sponge and allow the grout to cure fully.
Time Estimate: 4–6 hours for an average kitchen backsplash
Difficulty Level: Moderate; suitable for beginner-to-intermediate DIYers
Essential Tools: Tile adhesive, notched trowel, spacers, level, wet saw or tile cutter, rubber float, sponge, measuring tape, bucket, and safety glasses
This short answer gives a clear roadmap, but the detailed step-by-step instructions below ensure a professional finish.
Why and When You Should Install a Ceramic Tile Backsplash
Benefits of a Ceramic Tile Backsplash
A ceramic backsplash does more than look beautiful:
- Protects walls from splashes and stains: Tiles act as a barrier against water, oil, and food spills.
- Adds visual appeal and design versatility: Tiles come in countless colors, textures, and patterns to match your kitchen style.
- Easy to clean and maintain: Smooth surfaces are simple to wipe down, reducing the effort needed to keep your kitchen looking fresh.
When to Consider Installing a Backsplash
Consider a ceramic tile backsplash in the following scenarios:
- During a kitchen renovation or remodel for a coordinated design.
- To replace old or damaged backsplash that has cracked, stained, or become outdated.
- To improve hygiene and prevent water damage, especially around sinks and stoves.
Common Mistakes to Avoid
To achieve a professional result, avoid these common pitfalls:
- Not preparing the wall properly, which can lead to uneven tiles or poor adhesion.
- Misaligning tiles or skipping spacers, resulting in inconsistent grout lines.
- Using the wrong adhesive or grout, which can compromise durability and performance.
How to Install Backsplash Ceramic Tile
Tools and Materials Required
Before starting, ensure you have everything ready:
- Tile adhesive/mastic and notched trowel
- Ceramic tiles, spacers, and grout
- Tile cutter or wet saw for precise cuts
- Level, measuring tape, pencil for accurate placement
- Sponge, bucket, gloves, and safety glasses
Preparing the Wall
- Clean the wall surface thoroughly to remove grease, dust, or loose paint.
- Repair any holes or cracks to create a smooth surface.
- Apply primer or a backer board if the wall is particularly uneven or moisture-prone.
Planning and Layout
- Measure and mark guidelines with a level and pencil to ensure straight rows.
- Dry-fit tiles to visualize placement and adjust spacing before adhesive application.
- Consider symmetry, especially around central features like sinks or stoves.
Installing the Tiles
- Apply adhesive to a small section of the wall with a notched trowel.
- Place tiles carefully using spacers for consistent gaps.
- Tap tiles gently with a rubber mallet or float to ensure they adhere evenly.
- Cut edge tiles as necessary using a wet saw for a clean finish.
Grouting the Tiles
- Mix grout according to the manufacturer’s instructions.
- Apply grout with a rubber float, pressing it into the joints.
- Remove excess grout with a damp sponge, wiping diagonally to avoid pulling grout out.
- Allow grout to cure fully, then apply a sealer if recommended for durability and stain resistance.
Estimated Time & Difficulty
- Preparation: 1 hour
- Tile installation: 2–3 hours (depending on backsplash size and complexity)
- Grouting and finishing: 1–2 hours
Tips: Beginners should work in small sections, while advanced DIYers may complete the full backsplash in one go.
Types of Ceramic Tile and Installation Options (Comparison Table)
| Tile Type | Best For | Pros | Cons | Cost Estimate |
|---|---|---|---|---|
| Glossy Ceramic | Standard kitchen backsplashes | Easy to clean, visually appealing | Shows fingerprints and scratches | $3–$8 per sq ft |
| Matte Ceramic | Modern kitchens | Minimal glare, hides stains | Slightly harder to clean | $4–$9 per sq ft |
| Subway Tile | Classic look | Timeless design, versatile | Requires precise spacing | $2–$7 per sq ft |
| Mosaic Tile | Accent walls | Highly decorative, flexible | More cuts and installation time | $5–$15 per sq ft |
Tips & Tricks for a Perfect Ceramic Tile Backsplash
Alignment and Spacing
- Always use spacers for consistent grout lines.
- Double-check level after every row to prevent sloping tiles.
Cutting Tiles Accurately
- Use a wet saw for clean, precise edges.
- Plan cuts before applying adhesive to reduce errors.
Preventing Mold and Mildew
- Seal grout lines to prevent moisture penetration.
- Ensure the wall behind the backsplash is completely dry before installation.
Speed vs. Quality
- Don’t rush adhesive drying time; work in manageable sections to maintain precision.
- Taking your time ensures a durable, professional finish.
Frequently Asked Questions (FAQs)
1. Can I install backsplash ceramic tile myself?
Yes, with proper tools, planning, and patience, DIY installation is feasible for most homeowners.
2. How long does it take to install a ceramic tile backsplash?
For an average kitchen, 4–6 hours, including preparation, installation, and initial cleanup.
3. What type of adhesive is best for kitchen backsplashes?
Thin-set mortar is most common for wall tiles; mastic can be used for smaller DIY projects.
4. Can I use large ceramic tiles for a backsplash?
Yes, but large tiles may require more precise leveling and adhesive coverage to prevent slippage.
5. How do I clean grout lines after installation?
Wipe immediately with a damp sponge during application; for hardened grout, use a grout haze remover.
6. Do I need to seal ceramic tiles?
Sealing is recommended for grout lines; tiles themselves usually do not require sealing unless porous.
7. Can backsplash installation be done over existing tile?
Yes, if the existing tiles are secure and the surface is cleaned and leveled.
8. How do I prevent tiles from cracking during installation?
Use the correct adhesive, avoid excessive pressure, and ensure proper spacing and backing support.
Conclusion: Mastering Ceramic Tile Backsplash Installation
Installing a backsplash ceramic tile is a rewarding project that protects your kitchen walls while elevating your space with style and functionality. Hire The Kichen Consultants now to carefully prepare the wall, planning the layout, installing tiles accurately, and finishing with proper grouting and sealing, you can achieve professional-quality results even as a DIYer. Remember, patience, the right tools, and attention to detail are key to a flawless finish. With this guide, you now have the knowledge and confidence to install a backsplash ceramic tile that lasts for years and transforms your kitchen into a functional and beautiful workspace.