Removing a kitchen backsplash may seem intimidating, but with the right tools, techniques, and guidance, it’s a manageable DIY project. Whether you’re remodeling your kitchen or replacing outdated tiles, knowing how to remove tile backsplash from kitchen walls efficiently can save time, money, and frustration. In this guide, we’ll walk you through the process step by step, share comparison methods, highlight common challenges, and answer frequently asked questions to ensure your backsplash removal is smooth and safe.
Short Answer: Removing a Tile Backsplash Made Simple
The fastest way to remove a tile backsplash is to use a combination of grout removal tools, chisels, and a hammer, taking care to protect your walls and surrounding areas. For stubborn tiles, a heat gun or oscillating multi-tool can speed up the process. On average, a small backsplash can take 2–4 hours for a DIYer, while larger projects may span a full day or more. Essential tools at a glance include:
- Hammer and chisel
- Putty knife or scraper
- Crowbar (for large tiles)
- Oscillating multi-tool (optional)
- Protective gloves, goggles, and dust mask
When Should You Remove a Backsplash?
Knowing when to remove a backsplash can make the project easier and safer. Typical signs include:
- Damage or cracks: Tiles that are chipped, loose, or have water damage.
- Kitchen remodel: Updating the look of your kitchen for modern design or layout changes.
- Outdated style: Old or clashing tile patterns affecting aesthetics.
Safety considerations matter always check for electrical wiring behind the backsplash and ensure the wall can support a new installation. Cost-wise, DIY removal is economical, but professional help might be worth it for large or complex projects.
Understanding Tile Backsplash Removal
Why Tile Removal Can Be Tricky
Tile backsplash removal can be challenging because of:
- Adhesives and grout: Tiles are usually glued with strong adhesive and separated by grout that protects the wall. Removing them can risk chipping or gouging drywall.
- Wall damage risk: Using excessive force can leave holes, cracks, or uneven surfaces.
- DIY vs professional: While DIY saves money, professionals minimize damage and save time, especially with stubborn tiles or large areas.
Types of Kitchen Backsplashes
The removal method depends on the tile type:
- Ceramic and porcelain: Break easily if handled incorrectly but are generally straightforward with chisels.
- Glass tiles: Require careful prying to avoid shattering.
- Natural stone (marble, granite): Heavier, need extra caution to prevent wall damage.
Each type may require slightly different techniques and tools to remove safely.
Tools and Safety Equipment Needed
To remove a backsplash efficiently, gather:
- Basic tools: Crowbar, putty knife, hammer
- Protective gear: Gloves, goggles, dust mask
- Optional tools: Oscillating multi-tool for grout and adhesive
- Safety tips: Cover countertops and floors, turn off electricity, and handle tools carefully to prevent injuries.
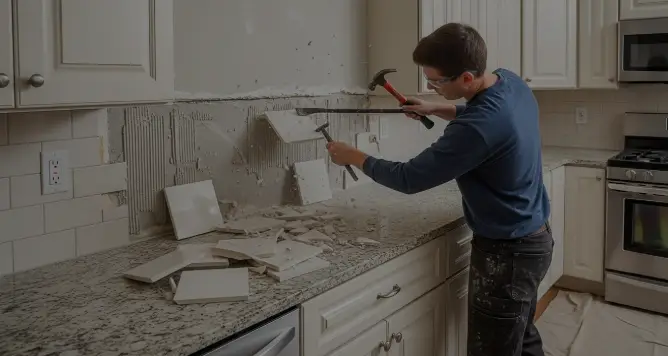
How to Remove Tile Backsplash from Kitchen
Step 1 – Prepare the Area
Begin by removing appliances, outlet covers, and any nearby fixtures. Protect countertops, cabinets, and floors with drop cloths or cardboard to catch debris. Safety first: ensure all electricity is turned off at outlets behind the backsplash.
Step 2 – Remove Grout
Grout can be removed manually with a grout scraper or using a power grout removal tool. Carefully score along the grout lines to loosen tiles. Take your time here rushing can crack neighboring tiles or damage drywall.
Step 3 – Remove Tiles
Choose between:
- Tile-by-tile removal: Safer for small areas or delicate tiles.
- Large section removal: Faster for strong adhesive tiles but riskier for wall damage.
Use a hammer and chisel or a pry bar to gently lift tiles. For stubborn tiles, a heat gun can soften adhesive, making removal easier.
Step 4 – Clean the Wall
After tile removal, scrape off residual adhesive using a putty knife or a sanding block. Patch holes or dents with spackling compound and sand until smooth. This ensures your wall is ready for a new backsplash or fresh paint.
Step 5 – Prepare for New Installation or Painting
Prime the wall with a high-quality primer for even adhesion. For areas prone to moisture (near sinks), consider a moisture-resistant backer board. A smooth, level wall ensures your new backsplash or paint job looks professional.
Tile Removal Methods
| Method | Tools Required | Pros | Cons | Best For |
|---|---|---|---|---|
| Manual Removal | Hammer, chisel, putty knife | Cheap, low-tech | Time-consuming, more effort | Small backsplash or DIY |
| Power Tool Removal | Oscillating tool, grout remover | Faster, less physical strain | Expensive, requires skill | Medium-large projects |
| Professional Removal | Contractor tools | Fastest, minimal wall damage | Costly | Entire kitchen remodel |
| Heat Method (for adhesive tiles) | Heat gun, scraper | Works on stubborn glue | Risk of wall/fire | Tiles with strong adhesive |
Common Challenges & How to Avoid Them
- Prevent wall damage: Always use gentle prying and work from grout lines.
- Stubborn adhesive: Heat guns or chemical adhesive removers can soften tough glue.
- Corners and edges: Use small chisels and patience for tight spots.
- Electrical outlets: Remove covers and carefully work around wiring to prevent accidents.
FAQs About Removing a Tile Backsplash
Can I remove a backsplash without damaging the wall?
Yes, with patience, proper tools, and careful technique, most tiles can be removed with minimal wall damage.
How long does it take to remove a kitchen backsplash?
Small areas may take 2–4 hours, while larger or adhesive-heavy backsplashes can take a full day or longer.
Do I need special tools for ceramic vs glass tiles?
Glass tiles are more fragile, so use small chisels, gentle prying, and protective gloves. Ceramic and porcelain can withstand moderate force.
Should I hire a professional or DIY?
For small or moderately sized backsplashes, DIY is feasible. For extensive projects, natural stone tiles, or stubborn adhesive, hiring a professional reduces risk.
How do I dispose of old tiles?
Check local regulations—tiles can often go to construction waste facilities or be repurposed for other projects.
Can I reuse the tiles after removal?
Some ceramic and porcelain tiles can be reused if removed carefully without breaking.
How to remove backsplash around outlets safely?
Turn off power, remove outlet covers, and carefully work with small tools around wires.
What’s the best way to clean adhesive residue?
Use a putty knife, adhesive remover, or sanding to achieve a smooth wall ready for new installation.
Conclusion
Removing a kitchen backsplash may seem daunting, but with preparation, the right tools, and careful technique, it’s entirely manageable. By following this step-by-step guide and considering the method best suited for your tile type, you can achieve a smooth, damage-free wall ready for your next kitchen upgrade. Whether you tackle the project yourself or hire a professional, understanding how to remove tile backsplash from kitchen ensures safety, efficiency, and a polished result.
For more guidance, check out related resources: “Installing a New Kitchen Backsplash” or “Best Tools for Tile Removal” to continue your remodeling journey with confidence.