Creating a durable and properly sloped shower base is one of the most critical steps when installing a walk-in shower. If done incorrectly, it can lead to leaks, water damage, and costly repairs. This guide will provide a complete, step-by-step approach on how to build a shower base for walk in shower, covering materials, preparation, installation, and finishing techniques. Whether you’re a DIY enthusiast or planning to hire a professional, this article has everything you need to know.
Short Answer: How to Build a Shower Base for Walk In Shower
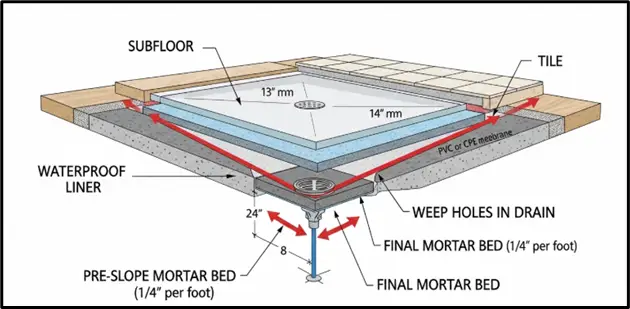
Building a shower base involves installing a pre-slope mortar bed, a waterproof liner, a final mortar pan, and ensuring proper drain placement. Essential materials include PVC liners, sand-cement mix, thin-set mortar, and a clamping drain assembly. Labor requirements depend on the complexity of the shower and the skill level of the installer.
The final durability of your shower base relies heavily on maintaining the correct slope toward the drain, thorough waterproofing, and proper tile compatibility. Experts like The Kitchen Consultants recommend paying extra attention to the pre-slope and liner installation to prevent future leaks.
Understanding Shower Base Construction: Core Factors
Materials Required
To build a reliable shower base, you’ll need the following materials:
- PVC or CPE liner: Provides waterproofing beneath the mortar bed.
- Sand-cement mortar (dry-pack): Used for creating the pre-slope and final base.
- Thin-set mortar: For adhering tiles to the final mortar bed.
- Drain assembly (two-piece clamping drain): Ensures water flows efficiently to the plumbing system.
- Waterproof backer board: Protects walls from moisture penetration.
DIY-friendly mixes are generally easier to work with but may be less durable over time, while professional-grade materials offer longevity and better performance under heavy use.
Subfloor Preparation
A clean, level, and stable subfloor is critical. Options include:
- Plywood subfloor: Common in renovations but must be reinforced.
- Concrete slab: Ideal for new builds or major remodels.
- Existing floor renovation: May require removing old tile or vinyl for a smooth surface.
Improper preparation can lead to leaks, uneven tile installation, or structural damage.
Drain Placement and Pre-Slope
The pre-slope is the foundation of a functional shower base.
- Maintain a slope of 1/4 inch per foot toward the drain.
- Two-piece clamping drains secure the liner and prevent leaks.
- Accurate slope is essential to avoid puddling, standing water, and mold growth.
Waterproofing and Liner Installation
A PVC or CPE liner acts as the primary waterproof barrier. Steps include:
- Cut liner to size and drape over the pre-slope.
- Extend at least 3 inches up the surrounding walls.
- Secure the liner only at the drain and top edge to avoid puncturing.
- Inspect for folds or gaps to prevent leaks.
Final Mortar Bed
The final mortar layer forms the actual shower floor:
- Apply 1–2 inches of sand-cement mortar over the liner.
- Ensure consistent slope to the drain.
- Smooth with a trowel and check for level.
- Allow 24–48 hours curing before tiling.
How to Build a Shower Base for Walk In Shower
Step 1 – Plan Your Shower Base
Decide on:
- Size and shape: Standard or custom layout.
- Location: Consider plumbing access and space.
- Tile type: Different tiles require specific base thicknesses.
Step 2 – Prepare the Subfloor
- Remove old flooring or clean the concrete.
- Reinforce the subfloor if necessary to prevent flexing.
- Ensure the area is free from debris and moisture.
Step 3 – Install the Drain and Pre-Slope
- Attach the drain to the waste pipe.
- Mix sand-cement (4:1 ratio) and create the pre-slope from walls to drain.
- Use a straightedge or level to maintain uniform slope.
Step 4 – Lay the Waterproof Liner
- Cut and lay PVC/CPE liner over the pre-slope.
- Clamp the drain securely.
- Extend the liner at least 3 inches up the walls.
- Avoid punctures or folds in the liner.
Step 5 – Pour Final Mortar Bed
- Apply the second layer of mortar (1–2 inches thick).
- Maintain 1/4 inch per foot slope toward the drain.
- Smooth surface to prepare for tiling.
Step 6 – Curing and Inspection
- Let mortar cure for 24–48 hours.
- Inspect for proper slope and smoothness.
- Ensure liner integrity before proceeding with tile installation.
Types of Shower Bases and Cost Considerations
Prefab vs. DIY Mortar Base
- Prefabricated shower pans: $200–$800, quick and easy installation, limited customization.
- DIY mortar base: $300–$1,200, fully customizable, durable, requires skill and labor.
- Hybrid kits: $400–$1,000, combines pre-made drain with mortar base, moderate skill required.
Materials Comparison Table
| Base Type | Material | Cost | Pros | Cons |
| Prefab Pan | Acrylic/Fiberglass | $200–$800 | Easy, fast, lightweight | Limited size, less durable |
| DIY Mortar Base | Sand-cement, PVC liner | $300–$1,200 | Fully customizable, durable | Labor-intensive, skill required |
| Hybrid Kits | Mortar + prefab drain | $400–$1,000 | Mix of convenience & custom | Moderate skill needed |
Common Questions People Also Ask
How long does it take to build a shower base for walk in shower?
Typically 1–3 days, including subfloor prep, pre-slope, liner installation, and curing.
Can I install a shower base myself?
Yes, but consider pros and cons:
- Pros: Cost-saving, control over materials.
- Cons: Risk of leaks, slope errors, tile misalignment.
How thick should a mortar shower base be?
- Pre-slope: 1–1.5 inches
- Final mortar: 1–2 inches
What slope should a walk-in shower floor have?
1/4 inch per foot toward the drain for proper drainage and to prevent puddling.
Can I use a prefab base in a custom-size shower?
Limited options. May require cutting or hybrid installation with a custom liner.
How do I waterproof a shower base correctly?
Combine:
- PVC/CPE liner installation
- Wall flashing
- Thin-set/tile sealing
- Avoid punctures or low spots
Cost estimate for building a DIY mortar shower base
- Materials: $300–$1,200
- Labor (DIY: free; pro: $500–$2,000)
- Tile and finishing extra
Conclusion
Building a shower base for a walk-in shower requires careful planning, precise slope, proper waterproofing, and quality materials. Following a step-by-step approach ensures a durable, leak-free, and long-lasting base. Whether using prefab options or a full mortar DIY installation, accuracy and preparation are key. Experts like The Kitchen Consultants recommend measuring, planning, and budgeting carefully to avoid future repairs.