Installing a shower drain in a concrete floor might seem daunting for many homeowners and DIY enthusiasts. Unlike wooden subfloors, concrete requires careful planning, precise cuts, and proper sealing to ensure the drain functions correctly and prevents water damage. A poorly installed drain can lead to leaks, structural issues, and expensive repairs. In this comprehensive guide, we’ll walk you through everything you need to know about how to install shower drain in concrete floor from understanding the basics to step-by-step instructions, comparisons of drain types, FAQs, and best practices.
Short Answer: How to Install Shower Drain in Concrete Floor Quickly
For those looking for a quick solution:
- Mark the drain location according to your plumbing layout.
- Cut the concrete safely using an angle grinder and chisel.
- Install the drain body into the existing plumbing, ensuring proper alignment and slope.
- Seal with mortar or concrete, integrating waterproofing if needed.
- Test for leaks by pouring water and verifying drainage.
Quick Tip: Always wear protective gear when cutting concrete, and double-check that your drain is watertight before finishing the floor. Even a small leak can lead to serious structural damage over time.
Understanding Shower Drain Installation in Concrete Floors
Installing a shower drain in a concrete floor requires more than just cutting a hole and inserting a drain. Understanding the process and potential challenges helps ensure long-term success.
Why Proper Installation of a Shower Drain in Concrete Floor Matters
- Prevents leaks and water damage: Incorrect installation can lead to water seeping beneath the floor, causing mold, rot, and structural issues.
- Ensures proper drainage and slope: A slope of approximately 1/4 inch per foot directs water efficiently to the drain.
- Avoids costly repairs: Fixing a poorly installed drain in concrete can be expensive, often requiring breaking and re-pouring sections of the floor.
Common Challenges When Installing a Shower Drain in Concrete
- Cutting and removing concrete safely: Requires precision and protective equipment.
- Aligning drain with existing plumbing: Misalignment can cause leaks or require extensive rework.
- Maintaining correct slope for water flow: Small errors in slope can lead to pooling or slow drainage.
- Sealing and waterproofing around the drain: Essential to prevent moisture from seeping under tiles or flooring.
Step-by-Step Guide to Install Shower Drain in Concrete Floor
Step 1: Plan and Mark the Drain Location
- Inspect your existing plumbing to ensure the drain connects properly.
- Measure carefully from walls and shower boundaries.
- Mark the concrete clearly to outline the cut. Precision here ensures minimal rework later.
Step 2: Cut and Remove Concrete
Tools Needed:
- Angle grinder with diamond blade
- Hammer and chisel
- Safety gear: gloves, goggles, mask
Technique:
- Score the outline first to minimize cracking.
- Remove concrete in layers rather than forcing the cut through the full thickness at once.
- Minimize dust with water or a vacuum attachment if possible.
Step 3: Prepare Drain Body and Plumbing Connections
- Attach the drain to your PVC or ABS waste pipe.
- Check alignment and slope (recommended 1/4 inch per foot).
- Apply primer and solvent cement to secure plumbing connections.
Step 4: Install the Drain in the Concrete Floor
- Position the drain in the cut opening.
- Verify that it is level and at the proper height relative to the finished floor.
- Adjust as needed before proceeding to sealing.
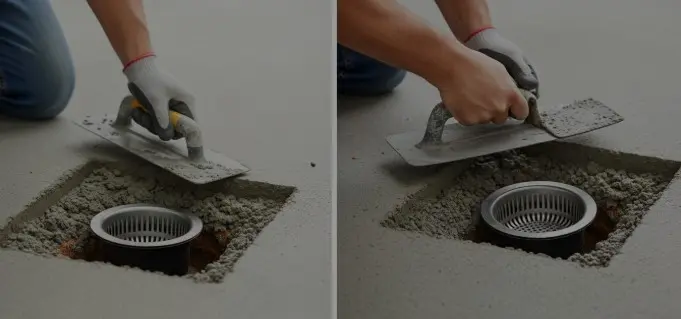
Step 5: Seal Around the Drain
- Use mortar, concrete, or thin-set to secure the drain in place.
- Integrate the waterproofing membrane if the floor will be tiled.
- Smooth the surface for a flush, even finish.
Step 6: Test for Leaks
- Pour water into the drain and observe for proper drainage.
- Check joints for leaks or seepage.
- Allow concrete or mortar to cure fully before installing tiles or finishing the floor.
Comparison Table: Types of Shower Drains for Concrete Floors
| Drain Type | Pros | Cons | Best For |
|---|---|---|---|
| PVC/ABS Drain | Easy to install, inexpensive | Can crack under heavy pressure | Standard residential showers |
| Stainless Steel Linear Drain | Sleek design, durable | More expensive | Modern, handicap-accessible showers |
| Round Floor Drain | Common, cost-effective | Less aesthetic, limited water flow | Simple, traditional showers |
| Tile-in Drain | Seamless look with tiles | Requires precise installation | High-end tiled showers |
FAQs About Installing Shower Drain in Concrete Floor
Can I install a shower drain in concrete myself?
Yes, with proper tools, planning, and safety measures, a skilled DIYer can install a shower drain. However, mistakes can lead to leaks, so professional guidance is recommended if unsure.
How deep should the drain sit in the concrete floor?
The drain should sit slightly below the finished floor to accommodate tile or flooring thickness while maintaining proper slope.
Do I need to waterproof around the shower drain?
Absolutely. Waterproofing prevents leaks under tiles and protects the concrete from moisture damage.
What tools are required to cut concrete for a drain?
An angle grinder with diamond blade, hammer, chisel, and personal protective equipment (gloves, goggles, mask) are essential.
How do I ensure proper slope for drainage?
Measure a slope of about 1/4 inch per foot from the floor edges toward the drain using a level or laser level.
Can I replace an old shower drain in a concrete floor?
Yes, but it requires removing the surrounding concrete carefully and may involve plumbing adjustments.
What is the cost of installing a shower drain in concrete?
Costs vary, but materials and labor typically range from $200 to $600 for standard residential installations.
How long does it take to install a drain and cure concrete?
The installation itself can take 4–6 hours, but concrete or mortar should cure 24–48 hours before finishing the floor.
Conclusion: Best Practices for Installing Shower Drain in Concrete Floor
Installing a shower drain in a concrete floor is a task that requires careful planning, precise execution, and attention to detail. Key takeaways include:
- Always plan and mark your drain location accurately.
- Ensure a proper slope to avoid pooling water.
- Use high-quality sealing and waterproofing techniques.
- Follow a step-by-step approach to minimize errors and ensure long-term durability.
- Conduct regular inspections after installation to catch any potential leaks early.
By adhering to these best practices, you can ensure a safe, efficient, and durable shower drainage system that stands the test of time. For professional help visit The Kitchen Consultants now!