Installing tile in a herringbone pattern is a timeless way to add sophistication and visual interest to floors and walls. Unlike traditional straight-lay tiles, herringbone offers a dynamic, interlocking design that enhances both modern and classic interiors. In this guide, we’ll break down how to install tile in a herringbone pattern, You can also hire The Kitchen Consultants discuss the best materials, compare installation methods, highlight common mistakes, and answer frequently asked questions.
Short Answer – How to Install Tile in a Herringbone Pattern
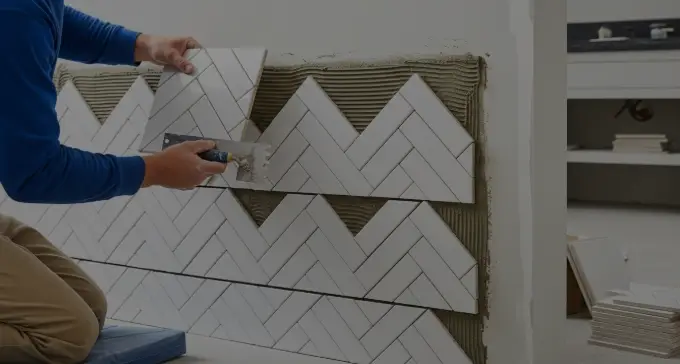
Herringbone tile installation involves arranging rectangular tiles in a zigzag pattern where each tile meets at a 90-degree angle with the adjacent one. The process begins with surface preparation, layout planning, and dry fitting tiles before applying adhesive. Using basic tools like a trowel, tile cutter, level, and spacers, a professional or DIY enthusiast can complete a typical room installation in 1–2 days, depending on size and experience.
Best Type of Tiles for Herringbone Pattern
Choosing the right tile is crucial for a successful herringbone layout:
- Porcelain Tiles: Durable, water-resistant, ideal for floors and high-traffic areas.
- Ceramic Tiles: Affordable and versatile; better suited for walls or light-use floors.
- Wood-Look Tiles: Offers the aesthetic of hardwood with the durability of tile; works well for herringbone accent floors.
Pros & Cons: Porcelain is long-lasting but heavier and more challenging to cut. Ceramic is easier to handle but less durable. Wood-look tiles add warmth but may require extra planning for grout color to blend seamlessly.
What Is a Herringbone Tile Pattern?
Definition and History
The herringbone pattern is a classic design originating from ancient Roman roads, where bricks were laid in a zigzag arrangement to enhance stability. Today, it’s widely used in interior design for flooring, backsplashes, and wall accents due to its elegant, timeless appeal.
Why Choose Herringbone for Your Floor or Wall
Herringbone creates a sense of movement and visual depth in a room. It can make small spaces appear larger, add sophistication to feature walls, and serve as a focal point in otherwise plain rooms. Its unique arrangement draws the eye and elevates standard tiling into a designer statement.
Tools and Materials Needed
Essential Tools
To install herringbone tiles effectively, you’ll need:
- Tile spacers
- Tile cutter or wet saw
- Notched trowel
- Level and straight edge
- Measuring tape
- Chalk line for layout
Materials Required
- Tiles (rectangular for herringbone)
- Tile adhesive or thin-set mortar
- Grout (sanded or unsanded based on tile spacing)
- Tile sealant (optional but recommended for porous tiles)
- Backer board or underlayment if needed
How to Install Tile in a Herringbone Pattern
Step 1 – Prepare the Surface
A smooth, clean, and level surface is essential. Remove old flooring, clean dust and debris, and repair uneven spots. This preparation ensures the tiles adhere properly and prevents future cracking or shifting.
Step 2 – Plan Your Layout
Find the center of the room and mark it with a chalk line. This line will guide your herringbone pattern, ensuring symmetry and balance. Measure carefully to avoid awkward gaps at walls.
Step 3 – Dry Lay Tiles
Before applying adhesive, lay out a small section of tiles to check fit, alignment, and the number of cuts required. Dry laying reduces mistakes and ensures a visually balanced installation.
Step 4 – Apply Adhesive
Using a notched trowel, spread thin-set mortar evenly over a small section of the floor or wall. Hold the trowel at a 45-degree angle for optimal coverage. Work in manageable areas to prevent adhesive from drying out prematurely.
Step 5 – Lay the First Tiles
Start at the center point. Place tiles at a 90-degree angle to form the classic herringbone “V” shape. Use spacers to maintain uniform grout lines and adjust as needed for perfect alignment.
Step 6 – Cutting Tiles for Edges
Edge tiles often require precise cuts. Use a wet saw for straight cuts and a tile nipper for small adjustments. Always measure twice before cutting to reduce waste.
Step 7 – Grouting
Once tiles are set, remove spacers and apply grout using a rubber float. Work diagonally to push grout into gaps and remove excess. Seal grout lines if necessary to protect against moisture and staining.
Step 8 – Finishing Touches
Clean the tiles with a damp sponge, remove any haze, and inspect for uneven grout lines or misaligned tiles. Apply sealant to tile edges or porous tiles for added protection and long-term durability.
Methods and Patterns
| Feature | Traditional Straight Lay | Herringbone Pattern | Chevron Pattern |
|---|---|---|---|
| Visual Appeal | Simple, uniform | Elegant, dynamic | Modern, directional |
| Complexity | Easy | Medium | Advanced |
| Material Wastage | Low | Medium | Medium-High |
| Recommended Use | Large floors, basic design | Feature walls, accent floors | Modern interiors, luxury design |
Common Mistakes to Avoid When Installing Herringbone Tile
- Misalignment of tiles leading to uneven pattern
- Incorrect spacing causing grout issues
- Ignoring proper surface preparation
- Skipping the dry layout step
- Using the wrong adhesive for tile type
FAQs About Installing Tile in a Herringbone Pattern
- Can I install herringbone tiles myself?
Yes, with careful planning, the right tools, and patience, a DIY enthusiast can install herringbone tiles, though experience helps for perfect alignment. - What type of tile works best for herringbone patterns?
Porcelain, ceramic, and wood-look tiles are most suitable, with porcelain being the most durable. - How much extra tile should I buy for cuts?
Typically, purchase 10–15% extra to account for cutting and mistakes. - Do I need special adhesive for herringbone?
Standard thin-set mortar works, but ensure it is compatible with your tile type. - How long does it take to install herringbone tile?
For a standard room, expect 1–2 days, depending on size, preparation, and experience. - Can herringbone be installed on walls as well as floors?
Absolutely. Wall installations may require lighter tiles and proper adhesive. - What is the difference between herringbone and chevron?
Herringbone has staggered ends, while chevron tiles meet at a point for a continuous “V” design. - How do I clean and maintain a herringbone tile floor?
Sweep regularly, mop with a gentle cleaner, and reseal grout every few years.
Tips for Perfect Herringbone Tile Installation
- Double-check measurements before cutting tiles
- Use spacers consistently for uniform grout lines
- Work in small sections to avoid adhesive drying too fast
- Keep a level handy throughout the process
- Seal grout lines to prevent staining and moisture penetration
Conclusion
Installing tile in a herringbone pattern is a visually striking way to elevate any space. By carefully preparing your surface, planning your layout, and following step-by-step installation guidelines, you can achieve professional results. With attention to detail and patience, herringbone tiles provide long-term durability and timeless elegance, transforming ordinary floors and walls into standout design features.