Tiling a kitchen countertop is a cost-effective way to upgrade your kitchen’s look while adding durability and style. Unlike solid surfaces such as granite or quartz, tile offers flexibility in patterns, textures, and colors, making it ideal for homeowners who want a customized, long-lasting countertop. If you’re considering a DIY project consider hiring The Kitchen Consultants now, cause we understand how to tile a kitchen countertop correctly is essential to ensure a polished and functional finish.
Quick Answer: How to Tile a Kitchen Countertop
Can you tile a kitchen countertop yourself?
Yes, you can tile a kitchen countertop yourself with the right tools, materials, and preparation. This DIY project requires patience, accuracy, and attention to detail. Proper surface preparation, correct adhesive selection, and precise tile placement are critical. Safety precautions like wearing gloves and eye protection are also recommended when cutting tiles.
How long does it take to tile a kitchen countertop?
The time it takes depends on the countertop size, tile type, and your experience level. For an average 6-8 foot countertop, a DIY project can take 2-3 days including surface prep, adhesive setting, and grout drying. Professionals may complete the job in 1-2 days, depending on the complexity of cuts and layout.
Cost range for tiling a kitchen countertop
The cost of tiling a kitchen countertop varies widely based on materials and labor:
- DIY projects: $150 – $500 for standard ceramic or porcelain tiles, including adhesive and grout.
- Professional installation: $600 – $1,500+ depending on tile type, countertop size, and edge finishes.
Tile countertops are generally more budget-friendly than stone surfaces, making them ideal for renovations without breaking the bank.
Understanding How to Tile a Kitchen Countertop
Why tile is a good option for countertops
Tile countertops offer multiple benefits:
- Durability: Ceramic and porcelain tiles are resistant to heat, scratches, and moisture.
- Aesthetic versatility: Tiles come in a range of colors, textures, and patterns.
- Customizability: You can mix sizes, colors, and materials to create a unique design.
- Ease of maintenance: Tiled surfaces are generally easy to clean with mild cleaners.
Materials and tools required
Before starting, gather these essentials:
- Tiles (ceramic, porcelain, natural stone, or mosaic)
- Tile adhesive or thin-set mortar
- Grout (sand or unsanded depending on tile spacing)
- Tile spacers
- Notched trowel
- Tile cutter or wet saw
- Sealer for grout and natural stone
- Level and measuring tape
- Sponge and bucket for cleaning
Having the right tools ensures smoother installation and professional-quality results.
Types of tiles suitable for kitchen countertops
Different tile types have distinct characteristics:
- Ceramic: Affordable, easy to install, and versatile.
- Porcelain: Highly durable, less porous, ideal for long-term use.
- Natural stone: Granite, marble, and slate offer a luxurious look but require sealing.
- Mosaic: Decorative, often used for accents or backsplash integration.
Selecting the right tile depends on your budget, aesthetic preference, and intended durability.
Guide to Tiling a Kitchen Countertop
Step 1 – Measure and plan your layout
Measure the length, width, and perimeter of your countertop. Plan your tile layout to avoid small slivers at edges or corners. Dry-lay a few tiles to visualize patterns and adjust spacing.
Step 2 – Prepare the countertop surface
Clean the surface thoroughly, removing grease and debris. Sand any uneven areas, and apply a primer or backer board if necessary to ensure tiles adhere properly.
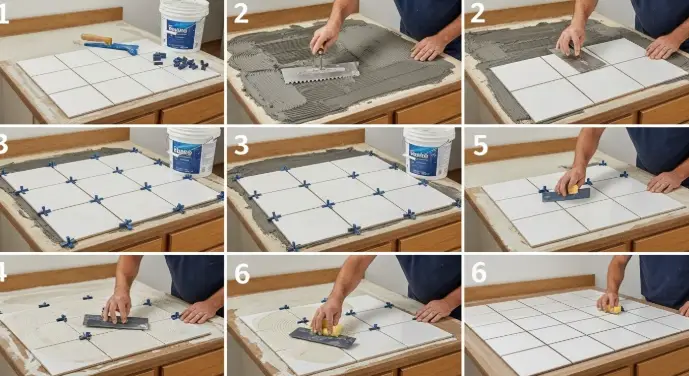
Step 3 – Apply adhesive/mortar
Use a notched trowel to spread tile adhesive evenly. Work in small sections to prevent it from drying before tile placement.
Step 4 – Lay the tiles
Position tiles carefully, using spacers to maintain even gaps. Check alignment frequently with a level. Cut edge tiles as needed with a tile cutter for a precise fit.
Step 5 – Let adhesive set
Allow the adhesive to dry completely. Drying times vary depending on the product, typically 24 hours.
Step 6 – Apply grout and seal
Fill gaps between tiles with grout using a rubber float. Wipe excess grout with a damp sponge. Once dry, seal tiles and grout to prevent stains and water penetration, especially for porous stone tiles.
Step 7 – Finishing touches
Remove haze from the tile surface, install edge trims for a professional finish, and caulk corners to prevent moisture buildup.
Comparison of Tiling Methods and Materials
| Feature/Option | Ceramic Tile | Porcelain Tile | Natural Stone | Mosaic Tile |
|---|---|---|---|---|
| Durability | Medium | High | High | Medium |
| Cost | $ | $$ | $$$ | $$ |
| Ease of Installation | Easy | Medium | Hard | Medium |
| Maintenance | Low | Low | Medium | Medium |
| Best Use | Budget-friendly | Long-lasting | Luxury countertop | Decorative accents |
This table helps homeowners choose the right material based on cost, maintenance, and durability.
Common Challenges When Tiling a Kitchen Countertop
Cutting tiles for edges and corners
Irregular edges or tight corners may require precise cuts with a wet saw or tile nippers. Measure twice to minimize mistakes.
Maintaining even grout lines
Consistent spacing ensures a professional appearance. Using high-quality spacers can prevent misaligned grout.
Avoiding cracks in tiles or grout
Over-tight spacing, uneven adhesive, or rapid drying can cause cracking. Follow manufacturer instructions for adhesive and grout.
Sealing natural stone properly
Natural stone requires periodic sealing to protect against stains, scratches, and water damage. Failing to seal can shorten the countertop’s lifespan.
FAQs About How to Tile a Kitchen Countertop
Can you tile over an existing countertop?
Yes, you can tile over certain surfaces like laminate or wood if properly prepared, but removing old surfaces is often recommended for longevity.
What is the best tile size for a kitchen countertop?
Tiles 4×4 inches or larger are common, but smaller tiles like mosaics are ideal for intricate patterns or curved edges.
How do you prevent grout from staining?
Seal both tiles and grout after installation. Avoid dark-colored foods and clean spills promptly.
Do I need professional help for tiling countertops?
DIY is possible with preparation, but complex layouts or natural stone may require professionals.
Can heat damage countertop tiles?
Most tiles withstand standard kitchen heat, but avoid placing hot pans directly on unprotected tiles.
How long does a tiled countertop last?
With proper installation and maintenance, tile countertops can last 20+ years.
Should I use epoxy or standard grout?
Epoxy grout is more durable and stain-resistant, ideal for kitchens, but standard grout is easier to work with for DIY projects.
Can I remove and replace a damaged tile easily?
Yes, but it requires careful chipping and replacement to avoid damaging surrounding tiles.
Conclusion
Tiling a kitchen countertop is a rewarding DIY project that combines functionality, durability, and design flexibility. By understanding materials, planning your layout, and following precise installation steps, you can achieve a professional-looking countertop that lasts for decades. Remember to measure carefully, select the right tile, apply adhesive and grout properly, and seal surfaces when necessary. With preparation and patience, tiling your countertop is not only feasible but can also significantly enhance the beauty and value of your kitchen.