
A clogged sink is one of the most common household annoyances, and in many cases, the culprit is the P trap. Learning how to clean P trap under sink can save you time, money, and the hassle of calling a plumber. This guide provides a complete, step-by-step approach to safely and effectively clean your P trap, along with tips to prevent future clogs.
Short Answer: How to Clean a P Trap Under Your Sink
The simplest way to clean a P trap is to first turn off the water supply, place a bucket under the trap to catch water, and then remove the trap to clear out hair, grease, or debris. Most clogs are caused by hair, soap scum, grease, and small food particles. Always wear gloves and have old towels handy to avoid spills.
Understanding the P Trap
What is a P Trap and How Does It Work?
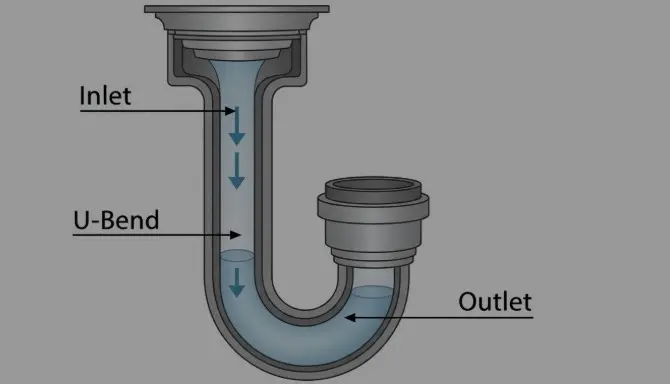
A P trap is a curved section of pipe under your sink designed to prevent sewer gases from entering your home. Its U-shaped bend traps a small amount of water, which acts as a barrier to block unpleasant odors while allowing wastewater to flow. Regular maintenance of the P trap keeps your plumbing efficient and odor-free.
Common Reasons a P Trap Gets Clogged
P traps often get clogged due to everyday debris that flows down the drain. Understanding the root cause helps prevent frequent backups.
| Cause | Symptom | Prevention Tip |
|---|---|---|
| Hair | Slow draining sink | Regular hair trap cleaning |
| Grease | Foul odor | Avoid pouring grease down sink |
| Food particles | Frequent clogs | Use sink strainer |
| Soap scum | Reduced water flow | Clean monthly |
| Small debris | Occasional backup | Rinse with hot water weekly |
Step-by-Step Guide: How to Clean P Trap Under Sink
Tools and Materials You’ll Need
Before starting, gather the following items:
- Bucket
- Adjustable wrench
- Gloves
- Brush or old toothbrush
- Old towels
- Optional: vinegar and baking soda for stubborn clogs
Step 1 – Prepare Your Area
Place a bucket beneath the sink to catch water from the P trap. Lay towels on the floor for extra protection and wear gloves to keep your hands clean. This simple prep prevents messes and ensures safety.
Step 2 – Remove the P Trap
Loosen the slip nuts connecting the P trap to the sink drain and wall pipe. Carefully remove the trap and empty any water and debris into the bucket.
| P Trap Type | Removal Method | Tip |
|---|---|---|
| PVC | Loosen slip nuts by hand/wrench | Avoid overtightening |
| Metal/Chrome | Use adjustable wrench | Wrap with cloth to avoid scratches |
| Bottle Trap | Twist bottom part off | Inspect washer for damage |
Step 3 – Clean the P Trap
Manually remove debris using a brush or gloved hands. For tougher clogs, soak the trap in a solution of vinegar and baking soda for 15–30 minutes. Rinse thoroughly with hot water to remove residue.
Step 4 – Reassemble and Test
Reattach the P trap securely by tightening the slip nuts. Run water to ensure the drain flows freely and check for leaks. If leaks occur, slightly adjust the nuts or check the washers for wear.
Alternatives & Comparison: Methods to Clean a P Trap
DIY Cleaning vs. Professional Cleaning
While DIY cleaning is often sufficient, some clogs may require professional assistance. Here’s a comparison of common methods:
| Method | Pros | Cons | Cost Estimate |
|---|---|---|---|
| Manual Removal & Cleaning | Immediate, low-cost | Requires basic tools | $0–$20 |
| Baking Soda & Vinegar | Eco-friendly | Slow for heavy clogs | $2–$5 |
| Professional Plumber | Guaranteed, thorough | Expensive, scheduling needed | $75–$150 |
Maintenance Tips to Prevent P Trap Clogs
Preventing clogs is easier than cleaning them. Consider these maintenance tips:
- Flush the sink with hot water weekly
- Avoid pouring grease or food particles down the drain
- Use a sink strainer to catch debris
- Monthly inspections and cleanings keep your P trap in optimal condition
- Optional: enzymatic drain cleaners can help break down organic buildup
FAQs About Cleaning P Trap Under Sink
1. How often should I clean my P trap?
Typically, every 3–6 months depending on usage. High-usage kitchens may need monthly cleaning.
2. Can I clean a P trap without removing it?
Minor debris can sometimes be flushed with hot water, but thorough cleaning requires removal.
3. What if the P trap is leaking after cleaning?
Check the slip nuts and washers; replace any damaged components. Tighten carefully to avoid cracking.
4. Are chemical drain cleaners safe for P traps?
They can damage PVC and metal pipes over time. Mechanical cleaning is safer and more effective.
5. How do I know if the clog is in the P trap or further down the pipe?
If water backs up in multiple sinks, the clog is likely beyond the P trap. Isolated slow drainage usually indicates a P trap clog.
6. Can I reuse the same P trap after cleaning?
Yes, as long as it is not cracked or corroded and washers are in good condition.
7. What is the best tool for clearing stubborn debris?
A flexible brush or plumber’s snake works best for removing hair and soap buildup.
8. How do I prevent bad odors from coming back?
Regular cleaning, flushing with hot water, and avoiding grease build-up prevent odors.
Conclusion
Cleaning your P trap under sink is a straightforward task that saves money and prevents plumbing headaches. By following this step-by-step guide, using the right tools, and implementing regular maintenance, you can ensure your sink drains smoothly and stays odor-free. For persistent clogs or damaged pipes, seeking professional help for your bathroom renovation is always a safe option. Regular attention keeps your plumbing in top condition and extends the life of your P trap.